Monday, July 19, 2010

Bagaimana nak tambah user dalam VM Esxi

Adoh hai .. tu la kalau nak cepat x baca tapi terus nak buat .. pening benda x tentu pasal. Padahal benda tu senang je cam kat bawah ni.

How to replace root user with different user name with same privileges

Rate This
Quantcast

There are always two important things in credentials one is the user name and other is password. In ESX world root is default user name. So every knows at least one part of it. It is standard security concern raised by IT Risk. Let’s de-Risk it.

In Windows world it is standard practice rename administrator account and add other user in administrators group. That is exact method we are going to do. Create a user esx-admin and assign it same group as root and then delete root user.

Do not delete root user

So here are how to steps

  1. Login to esxi host directly using vi client
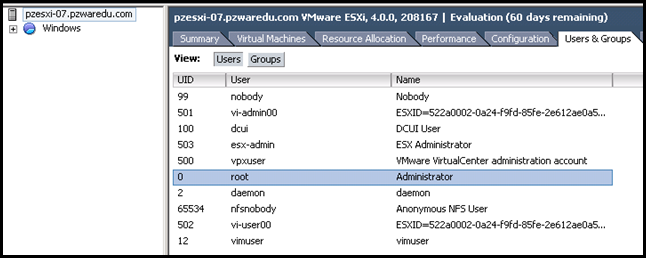
  2. Go to users & group as shown below
  3. image
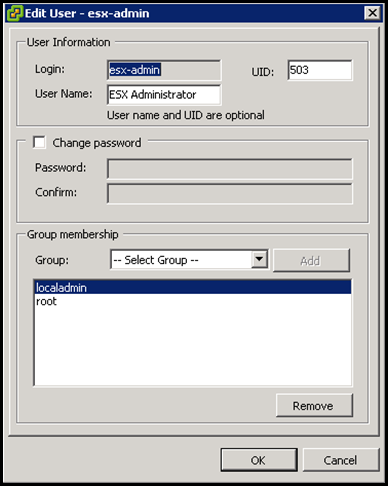
  4. Create new user. In my case I took esx-admin name
  5. image
  6. Only fill up Login name, password and leave User name and UID blank which are optional. User name here is description that is it. Do not get confused with windows user creation style
  7. Add localadmin and root group under group membership and Press ok
  8. At this point you can access console i.e. DCUI using esx-admin user credentials but you cannot access vCenter
  9. To get it working, go provide at the root of esx host administrator permission to esx-admin
  10. image
  11. Last and important step, stop using Root user for doing any administration purpose for 1 month and then safely delete root user.
  12. Last and important step, stop using Root user for doing any administration purpose and use it only when VMsupport or other emergency case only.Do not delete it
  13. Store root credentials at some safe place.

Tuesday, July 13, 2010

Naper la aku guna VMWARE esxi ni ....

Author Details
Author: NetworkAdminKB.com
Created: 2008-02-05
Modified: 2008-11-19
Article Content

Issue:

You have not purchased VirtualCenter Server and you are unable to clone a Virtual Machine (VM) on a standalone ESX server using the VI Client.

Cause:

Cloning is only available with VirtualCenter Server.

Solution:

While VirtualCenter Server makes it very easy to clone a VM, it is possible to use command line utilities to simulate the “clone” process that the VirtualCenter Server uses. What follows is the basic procedure that will allow you to manually “clone” (copy) a VM to another directory, modify the configuration files to give the new copy a unique identity, then add the clone to the ESH server’s inventory as a new VM.

Assumptions

1) You have SSH or Console access to the ESX server.

2) You know the root admin password.

Instructions

1) Create a source virtual machine and install the OS.

a. Prepare the OS as needed to be cloned.

2) Power off the source virtual machine

3) Make an SSH connection or login to the Console of the server.

a. If using SSH, use “SU --login” to gain root admin rights to the server.

4) Change to the VMFS location where the source machine is stored.

a. cd /vmfs/volumes/<lun_name>

b. > is the name of the storage on the ESX host.

5) Copy the source VM to the clone destination

a. cp –arp SourceFolder CloneFolder

b. SourceFolder is the name of the source VM that is to be cloned

c. CloneFolder is the name of the Clone VM you wish to create in VMWare.

d. Note: Adding “ &” at the end will put the command into background processing since it will take a while. This is handy if you want to do other things while you wait.

6) Wait for the copy to complete

7) Change to the CloneFolder

a. Cd CloneFolder

8) Rename the files to match the CloneFolder name

a. The folder name and file names should match and are case sensitive.

b. mv source-flat.vdmk CloneFolder-flat.vdmk

c. mv source.nvram CloneFolder.nvram

d. mv source.vdmk CloneFolder.vdmk

e. mv source.vmx CloneFolder.vmx

f. mv source.vmxf CloneFolder.vmxf

9) Delete the original VMSD file

a. rm source.vmsd

b. Normally this file is empty and will be re-created.

10) Edit CloneFolder.vmdk file

a. Remember that the file names are case sensitive.

b. Relpace “source-flat.vdmk” with “CloneFolder-flat.vdmk”

11) Edit CloneFolder.vmx

a. Replace the following 4 instances of the SourceFolder with CloneFolder. Remember that the file names are case sensitive

i. Nvram

ii. displayName

iii. extendedConfigFile

iv. scsi:0.fileName

b. Delete the line sched.swap.derivedName

i. This contains a vswp filename that will be recreated.

12) Open the VI Client and connect to the ESX server.

13) Browse to the datastore where the CloneFolder resides

14) Right Click the .VMX file in the CloneFolder

a. Select Add to Inventory

b. Type the display name of the server.

i. Click Next

c. Click Next on the Resource Pool selection

d. Click Finish

15) Power on the new Cloned VM

16) A window may appear or on the Summary tab you may see the following message.

a. msg.uuid.moved: The location of this virtual machine’s configuration file has changed since it was last powered on…

b. Select “Create”

c. Click OK

17) The clone is now completed.

18) Notes: If the MAC of the NIC is set to manual you will need to change it using the VI Client. If the NIC is configured to automatically select a MAC, it will be changed upon start up.

Monday, July 12, 2010

Install phpMyAdmin

Ini pon satu lagi kegemaran programmer. Aku pon install jika depa nak

caranya adalah dowload dari http://downloads.sourceforge.net/project/phpmyadmin/phpMyAdmin/3.3.4/phpMyAdmin-3.3.4-english.tar.gz?use_mirror=biznetnetworks&ts=1278921806

Selepas itu masuk dalam webmin extract file tu dalam root apache

Config setup

cd phpMyAdmin
sudo mkdir config # create directory for saving
sudo chmod o+rw config # give it world writable permissions

sudo cp config.inc.php config/ # copy current configuration for editing
sudo chmod o+w config/config.inc.php # give it world writable permissions

sudo mv config/config.inc.php .         # move file to current directory
sudo chmod o-rw config.inc.php # remove world read and write permissions
sudo rm -rf config # remove not needed directory

Install Webmin dalam server Ubuntu

Pengalaman aku install webmin ni , aku suka guna dari tar sebabnya ia kan install sepenuhnya dan jarang aku ada masalah dgn installation tar.

Hei apa webmin ni , ooo.. webmin ni adalah linux nye menu antaramuka untuk manage services dalam bentuk web. Ianya mudah sebab dalam bentuk grafik , aku memang dah wajib install webmin ni dalam setiap server aku. Sebabnya kalau aku x de orang lain boleh handle dengan mudah x yah nak guna command kat console. So x de lah orang nak cari aku malam2 buta ni ...

Installing the tar.gz file

Sebelum memulakan install webmin kita perlu selesai beberapa checklist iaitu perlu ada wget untuk dapat file webmin terus dari laman webnya.

sudo apt-get install wget

Kemudian download terus dari laman webnya mengikut versi terkini. Selalunya saya akan pergi ke link dan copy link dan paste

sudo wget http://downloads.sourceforge.net/project/webadmin/webmin/1.510/webmin-1.510.tar.gz?use_mirror=biznetnetworks&ts=1278920977

Before downloading Webmin, you must already have Perl 5 installed on your system. Perl is usually installed as /usr/local/bin/perl or /usr/bin/perl, and comes as part of most recent versions of Linux. If you don't have Perl, you can download the source from http://www.psource from http://www.perl.com/ and compile it for your system. Most operating systems come with Perl these days, so check your operating system CD or website for a package as well.

When unpacked, the distribution creates a subdirectory called webmin-1.510 under the current directory. Since recent versions of Webmin support installation into a directory of your choice, you can pick a destination directory such as /usr/local/webmin. Then run the following commands in the directory containing the webmin-1.510.tar.gz file :

sudo gunzip webmin-1.510.tar.gz
sudo tar xf webmin-1.510.tar
sudo cd webmin-1.510
sudo ./setup.sh /usr/local/webmin

When the setup.sh script is run, it will ask the following questions :

  • The Webmin configuration directory
    The directory in which all Webmin configuration information is stored. This is now separate from the Webmin install directory, so that configurations are saved when you upgrade.
    If you have previously installed Webmin and use the same config directory, this will be the only question asked.

  • The Webmin log directory
    The location for pid and webserver log files.

  • The full path to perl on your system
    This is usually /usr/bin/perl or /usr/local/bin/perl

  • Your Operating system type
    In Webmin versions 0.990 and above, this question is only asked if your operating system cannot be automatically determined.
    The setup script will display a list of supported systems. If your OS is not on the list, you can try choosing the closest match. However this may not work properly, and may even cause serious problems!

  • Web server port
    The TCP port that the Webmin web server will listen on.

  • Web server login and password
    The login name and password used to acess the Webmin web server.

  • Web server hostname
    The hostname of the machine on which Webmin will run.

  • Use SSL
    This question will only be asked if your system has the Perl SSL libraries installed. See below for more..

  • Start Webmin at boot time
    If your OS is supported, Webmin will ask if you want to have it automatically started at boot time.

Assuming you answer all the above questions correctly, the Webmin web server will be started and the setup script will give you the URL to go to. Enter this URL into your browser, and you will be prompted for the login and password that you choose in setup.sh. Once you have logged in your browser should show the main Webmin page, on which is an icon for each module you have installed.

Typically you can connect to Webmin at http://localhost:10000/. Or if accessing it remotely, replace localhost with your system's IP address.

If you installed Webmin by specifying an installation directory parameter to setup.sh as the instructions above show, the original webmin-1.510 directory can now be safely deleted.

Configure LAMP dalam UBUNTU

Install server LAMP bagi salah satu aplikasi yang digunakan diopis. So aku cari tutorial untuk LAMP. Harap berjaya la kot. Hehehehe masa aku cut and paste .. aku pon tengah cuba install ikut tutorial .. Oleh itu sekiranya post ni kuar maka ini bermakna tutorial tu betul untuk mesin aku ni ...

Set up a LAMP Server on Ubuntu 10.04 LTS (Lucid)

Author: Sam KleinmanExternal Link
Published: April 29, 2010

This guide provides step by step instructions for installing a full featured LAMP stack on an Ubuntu 10.04 LTS (Lucid) system. The 10.04 release is the most current release of the Ubuntu operating system, and will be supported with security updates until April of 2015.

In this guide, you will be instructed on setting up Apache, MySQL, and PHP. If you don't feel that you will need MySQL or PHP, please don't feel obligated to install them.

These instructions work with the Linode platform. If you don't have a Linode yet, sign up for a Linux VPS and get started today.

System Configuration Link

It is important to make sure that your system is properly configured before installing Apache. In particular, you need to make sure that your system is up to date and that you have set the correct timezone, hostname, and hosts in your hosts file. If you haven't configured these, you should follow the directions in the getting started guide. Be sure to modify your /etc/hosts file to set a fully qualified domain name (FQDN) for your Linode. This guide assumes that you are logged in as the root superuser on your VPS.

Install and Configure the Apache Web Server Link

The Apache Web Server is a very popular choice for serving web pages. While many alternatives have appeared in the last few years, Apache remains a powerful option that we recommend for most uses.

Make sure your package repositories and installed programs are up to date by issuing the following commands:

sudo apt-get update
sudo apt-get upgrade --show-upgraded

To install the current version of the Apache web server (in the 2.x series) on an Ubuntu system use the following command:

sudo apt-get install apache2

Now we'll configure virtual hosting so that we can host multiple domains (or subdomains) with the server. These websites can be controlled by different users, or by a single user, as you prefer.

Configure Virtual Hosting Link

There are different ways to set up virtual hosts, however we recommend the method below. By default, Apache listens on all IP addresses available to it. We must configure it to listen only on addresses we specify. Even if you only have one IP, it is still a good idea to tell Apache what IP address to listen on in case you decide to add more.

Begin by modifying the NameVirtualHost entry in /etc/apache2/ports.conf as follows:

File excerpt:

sudo vi /etc/apache2/ports.conf

NameVirtualHost 12.34.56.78:80

Be sure to replace "12.34.56.78" with your Linode's public IP address.

Now, modify the default site's virtual hosting in the file /etc/apache2/sites-available/default so that the entry reads:

File excerpt:

sudo vi /etc/apache2/sites-available/default


This command symbolically links your virtual host file from sites-available to the sites-enabled directory. Finally, before you can access your sites you must reload Apache with the following command:

sudo /etc/init.d/apache2 reload

Install and Configure the MySQL Database Server Link

MySQL is a relational database management system (RDBMS) and is a popular component in contemporary web development tool-chains. It is used to store data for many popular applications, including Wordpress and Drupal.

Install MySQL Link

The first step is to install the mysql-server package, which is accomplished by the following command:

sudo apt-get install mysql-server

During the installation you will be prompted for a password. Choose something secure (use letters, numbers, and non-alphanumeric characters) and record it for future reference.

At this point MySQL should be ready to configure and run. While you shouldn't need to change the configuration file, note that it is located at /etc/mysql/my.cnf for future reference.

Configure MySQL and Set Up Databases Link

After installing MySQL, it's recommended that you run mysql_secure_installation, a program that helps secure MySQL. While running mysql_secure_installation, you will be presented with the opportunity to change the MySQL root password, remove anonymous user accounts, disable root logins outside of localhost, and remove test databases. It is recommended that you answer yes to these options. If you are prompted to reload the privilege tables, select yes. Run the following command to execute the program:

mysql_secure_installation

Next, we'll create a database and grant your users permissions to use databases. First, log in to MySQL:

mysql -u root -p

Enter MySQL's root password, and you'll be presented with a MySQL prompt where you can issue SQL statements to interact with the database.

To create a database and grant your users permissions on it, issue the following command. Note, the semi-colons (;) at the end of the lines are crucial for ending the commands. Your command should look like this:

create database lollipop;
grant all on lollipop.* to 'foreman' identified by '5t1ck';
flush privileges;

In the example above, lollipop is the name of the database, foreman is the username, and 5t1ck password. Note that database user names and passwords are only used by scripts connecting to the database, and that database user account names need not (and perhaps should not) represent actual user accounts on the system.

With that completed you've successfully configured MySQL and you may now pass these database credentials on to your users. To exit the MySQL database administration utility issue the following command:

quit

With Apache and MySQL installed you are now ready to move on to installing PHP to provide scripting support for your web pages.

Install and Configure PHP Link

PHP makes it possible to produce dynamic and interactive pages using your own scripts and popular web development frameworks. Furthermore, many popular web applications like WordPress are written in PHP. If you want to be able to develop your websites using PHP, you must first install it.

Ubuntu includes packages for installing PHP from the terminal. Issue the following command:

sudo apt-get install php5 php-pear

Once PHP5 is installed we'll need to tune the configuration file located in /etc/php5/apache2/php.ini to enable more descriptive errors, logging, and better performance. These modifications provide a good starting point if you're unfamiliar with PHP configuration.

Make sure that the following values are set, and relevant lines are uncommented (comments are lines beginning with a semi-colon (;)):

File excerpt: /etc/php5/apache2/php.ini

max_execution_time = 30
memory_limit = 64M
error_reporting = E_COMPILE_ERROR|E_RECOVERABLE_ERROR|E_ERROR|E_CORE_ERROR
display_errors = Off
log_errors = On
error_log = /var/log/php.log
register_globals = Off

After making changes to the PHP configuration file, restart Apache by issuing the following command:

sudo /etc/init.d/apache2 restart

If you need support for MySQL in PHP, then you must install the php5-mysql package with the following command:

sudo apt-get install php5-mysql

To install the php5-suhosin package, which provides additional security for PHP 5 applications (recommended), you must add the "universe" software repositories. Uncomment the following lines from /etc/apt/sources.list:

File excerpt:

sudo vi /etc/apt/sources.list

deb http://us.archive.ubuntu.com/ubuntu/ lucid universe
deb-src http://us.archive.ubuntu.com/ubuntu/ lucid universe
deb http://us.archive.ubuntu.com/ubuntu/ lucid-updates universe
deb-src http://us.archive.ubuntu.com/ubuntu/ lucid-updates universe

deb http://security.ubuntu.com/ubuntu lucid-security universe
deb-src http://security.ubuntu.com/ubuntu lucid-security universe

Now run the following command to update the package archive:

sudo apt-get update

Finally, install the suhosin package by issuing:

sudo apt-get install php5-suhosin

Restart Apache to make sure everything is loaded correctly:

sudo /etc/init.d/apache2 restart

Congratulations! You've set up a LAMP server on Ubuntu 10.04 LTS. Happy serving!

Partition Error dalam ESXi untuk iSCSI guna FreeNAS

So pueh dah aku configure akhir berjaya juga set satu iSCSI untuk ESXi aku. tapi rupanya gak problem. hampeh VMware: Failed to get disk partition information .Tapi aku letak kaedah ni untuk rujukan sahaja. Aku guna cara aku iaitu aku create satu disk iSCSI 10mb sebagai satu dummy kendian baru aku create disk yang aku nak. Baru lah ok . Kaedah dibawah boleh cuba .. kalau sapa nak cuba lah

After creating a new IETD configuration at home, i wanted to add the new iSCSI LUN to my ESXi server. Everything went fine, the LUN was presented and the Add storage wizard has found the new LUN. But when i wanted to complete the wizard, the following error came up:

image

In KB2240, you’ll find the following solution:

The easiest workaround is to use another disk for a datastore. If this is not possible, create the VMFS datastore manually. To do this:

  1. Use fdisk on the /dev/sd[a-z]* device. Create a partition with type 0xfb.
  2. Format the VMFS datastore using
    vmkfstools -C vmfs3 vmhbaI:T:L:P
    In this example, I corresponds to the initiator of the VMware host bus adapter, T corresponds to the target number of the disk, L is the LUN number, and P is the partition number of the newly created partition.

If you don’t know how to use fdisk, you can use this guide:

1. Log on to the console or use putty to connect to the ESX host remotely. If you have not created a user for yourself you will not be able to log in through putty.

2. SU to root. This must be done using the su – root command. If you do not use the – then you will not get root’s path and thus get error messages that say that commands cannot be found.

3. Run fdisk -l. This will give you a list of all of your current partitions. This is important because they are numbered. If you are using SCSI you should see that all partitions start with /dev/sda# where # is a number from 1 to what ever. Remember this list of number as you are going to be adding at least one more and will have to refer to the new partition by it’s number.

4. Run fdisk /dev/sda. This will allow you to create a partition on the the first drive. If you have more than one SCSI drive (usually the case with more than one RAID container) then you will have to type the letter value for the device you wish to create the partition on (sdb, sdc, and so on).

5. You are now in the fdisk program. If you get confused type "m" for menu. This will list all of your options. There are a lot of them. You will be ignoring most of them.

6. Type "n". This will create a new partition. It will ask you for the starting cylinder. Unless you have a very good reason hit "enter" for default. The program will now offer you a second option that says ending cylinder. If you press enter you will select the rest of the space. In most cases this is what you want.

7. Once you have selected start and end cylinder you should get a success message. Now you must set the partition type or it’s ID. This is option "t" on the menu.

8. Type "t". It will ask you for partition number. This is where that first fdisk is useful. You need to know what the new partition number is. It will be one more than the last number on fdisk. Type this number in.

9. You will now be prompted for the hex code for the partition type. You can also type "L" for a list of codes. The code you want is "fb". So type "fb" in the space. This will return that the partition has been changed to fb (unknown). That is what you want.

10. Now that you have configured everything you want to save it. To do so choose the "w" option to write the table to disk and exit.

11. Because the drive is being used by the console OS you will probably get an error that says "WARNING: Re-reading the partition table failed with error 16: device or resource busy." This is normal. You will need to reboot.

12. To reboot the server type "reboot" at the prompt.

13. Once you have rebooted you can now format the partition VMFS. DO NOT do this from the GUI. You must once again log into the console or remote in through putty.

14. Once you have su’d to root you must type in "vmkfstool -C vmfs3 /vmfs/device/disks/vmhba0:0:0:#" Were # is the number of the new partition. You shoulder now get a "successfully created new volume" message. If you get an error you probably chose the wrong partition. Do an fdisk – l and choose the number with the "unknown" partition type. Note: IF you have more than one SCSI disk or more than one container the first 0 may need to be a 1 as well.

15. Go to the GUI and in configuration/storage select refresh. You should now see your new VMFS volume.

Configure FreeNAS - iSCSI untuk ESXi

Hari ini berbeza sket , sebab selalunya dalam ni cite pasal ubuntu tapi kali ni aku nak setkan satu storage yang dipanggil iSCSI untuk digunakan oleh ESXi untuk host server-server Ubuntu aku. Sorry aku cut and paste dulu takut lupa , dia dalam bahasa inggeris ok. So aku dapat tutorial ni setelah pueh mencarinya di google.

FreeNAS 0.7 – Add an iSCSI Target for beginners

Since the graphic interface in FreeNAS 0.7 has changed, finding some good tutorials on how to mount an iSCSI target prooved imposible. Neither Google nor http://sourceforge.net/apps/phpbb/freenas/ helped. And just because I was missing bits of information, I was getting various errors. Like this one:

Mar 22 08:28:51 freenas root: Failed to start service iscsi_target
Mar 22 08:28:51 freenas istgt[3194]: istgt.c:1247:main: ***ERROR*** istgt_lu_init() failed
Mar 22 08:28:51 freenas istgt[3194]: istgt_lu.c:1513:istgt_lu_init: ***ERROR*** LU1: lu_disk_init() failed
Mar 22 08:28:51 freenas istgt[3194]: istgt_lu_disk.c: 407:istgt_lu_disk_init: ***ERROR*** LU1: LUN0: open error
Mar 22 08:28:51 freenas istgt[3194]: istgt version 0.2 (20090428)

So here is my “prooved-to-work” step-by-step tutorial.

A. Prerequisites:

-FreeNas 0.7 is installed and running on a hard-drive or USB thumb-drive (I prefer this one). I am using revision 4919.

- Web interface is up and running.

- At least one empty HDD, preferably with no previous partitions of any kind.

- Patch the FreeNAS machine with the updated file “iscsi_target.sh” and add it to both /etc/rc.d/ and /cf folders. See http://sourceforge.net/apps/phpbb/freenas/viewtopic.php?f=53&t=4561&start=10#p22148 for details. Do not skip this patch!

B. Initialize the Hard Drive.

1. In the web interface go to Disks -> Management . (In my screenshot I already have two disks installed). Click on “plus” sign to add the harddrive:

Add new disk - step 1

2. In the next screen, choose the target disk from the drop-down menu (if it is not listed, there is either a hardware problem or disk may have some partitions on it – try Rescan disks); and choose the Preformated file system as “UFS (GPT and Soft Updates). The other two marked fields are optional (for S.M.A.R.T. you need to have the service enabled). Then click Add button.

Add New Disk - step 2

3. Click Apply changes (see bellow). The status of the newly added disk should be “Initializing”. One thing I found is that this status will not change to ONLINE by pressing again Apply Changes or Rescan disks. Only a complete restart will do. I do not recommend going further unless the disk is listed ONLINE. Therefore, reboot the FreeNAS machine.

Add New Disk - step 3

Once the machine is up and running again, login into web interface and check the ONLINE status of the disk in Disks->Management.

4. Go to Disks->Format and (carefully) choose your disk from the drop down list , use “UFS (GPT and Soft Updates)” as File system and type in a Volume label. Click Format disk (this will erase all data on that disk) . Confirm it.

Add New Disk - Step 4

5. Go to Disks->Mount Point and click on the “plus” sign to mount the newly added disk.

Add New Disk - Step 5

6. In this window choose Type=”Disk”, Disk=”Your disk “, Partition Type=”GPT Partition”, Partition number=”1″, File System “UFS” and Mount point name=”Some name” (I chose MyiSCSI). You can add a description if you like. For simplicity leave everything else at default (not recommended in production). When done, click Add.

Add New Disk - Step 6

7. Click Apply changes in next screen. This will do two things: change the Status of the disk from “Initializing” to “OK” and mount it in the /mnt/MyiSCSI directory (or whatever you named your Mount Point at step 6):

Add new disk - Step 7

Optional, you can now go into FreeNAS console and create subdirectories in /mnt/MyiSCSI/ directory - should you need a more structured layout for future targets.

C. iSCSI Target Preinitialization.

Before adding a new iSCSI target there are few steps to initialize iSCSI service and other parameters.

1. Go to Services->iSCSI Target and enable the iSCSI target. For simplicity, leave all parameters at default value. Click Save and Restart. You can verify if the iSCSI service started properly in Services->Status. Both columns should be checked.

Enable iSCSI service - Step 1

2. In Services->iSCSI Target click on Portals tab. Click on the “plus” sign.

Enable iSCSI service - Step 2

3. In here, change the IP address from 0.0.0.0:3260 to the IP address of your machine (the one that the iSCSI initiators will look for). Port number should stay the same (3260) Then click Add.

Enable iSCSI Service - Step 3

Click Apply changes button to commit changes (screenshot not available)

4. In Services -> iSCSI Target go to Initiators Tab and click the “plus” sign.

Enable iSCSI service - Step 4

5. You can leave everything at default values. If you want to implement some security (advisable) add the IP Addreses for your initiators ( format is 192.168.1.1) and/or the network where they belong (format 192.168.1.0/24). Click Add button.

Enable iSCSI service - Step 5

Click Apply changes button to commit changes (screenshot not available)

D. Adding an iSCSI Target

1. In Services iSCSI Target click on Targets Tab. Click on the “plus” sign in Extent section.

Add a Target - Step 1

2. In the Add extent window leave Extent name at default and select Type as “File”. Path is where it gets tricky. Using the browse button, you can browse to /mnt/MyiSCSI directory (or whatever your mountpoint name is) and to its subdirectories (if created at step B7) but YOU HAVE TO MANUALLY TYPE the file name for the extent. I named mine “Target1″. Choose a file size that can go up to the disk’s capacity (I chose 40 GB on a 80 GB disk). If it is smaller you can use the difference for additional iSCSI targets on the same disk. When done click Add.

Add Target - Step 2

Click Apply changes button to commit changes. You should see the extent listed there (see next screenshot).

3. In Services iSCSI Target click on Targets Tab. Click on the “plus” sign in Target section.

Add Target - Step 3

4. Leave the target name as default, Type as “Disk”. Flags should be changed by preference but I would stick to either read-only or read-write. Storage should have the extent you created at step 2 (verify the path). Everything else can be left as default. Click Add button when done (not shown).

Add Target - Step 4

5. Click Apply changes button to commit changes (screenshot not available). This is normally the step when you get errors if something went wrong. Otherwise you should see something similar to this:

Add Target - Final

Verify that iSCSI service is still running (in Services->Status or Diagnostics -> Log menus). Also, you can use Windows iSCSI Initiator to quickly prove that is functional.

If you get errors check the error message (obviously) and also check the System Log in Diagnostics ->Log menu.

6. (optional) For more targets on same physical disk repeat steps D1 to D5. Make sure you don’t overlap with disk space allocation.